
I've been using TPE to plan where & when to be for good sun/moon shots for a while. It's a wonderful tool, well worth checking out. Just in case you haven't used TPE the idea is that it'll tell you all about the location of the sun and moon in the sky for any location on earth and any particular day and time. It's very handy for planning where and when to be in order to get great sunrise/sunset/moonrise/moonset shots. I find both the PC and iPhone versions to be useful. The former for a bigger view and quicker browsing and the latter for portability and extra features. I don't have the iPad version for the simple reason that I don't (yet) have an iPad.
While I've used it to figure out where to stand and about what time I needed to be standing there I've never before explored just how precise the predictions could be. The iPhone version will show the bearing to the sun/moon at any given time as well as giving the angular altitude above the horizion. I've never had a good feeling for just how high above the horizon 5° looks. Is that high? Not so high? I just didn't know.
While driving to the shoot last Saturday it occured to me that I'd be in a good place to get some insight. So I made sure my camera clock was set to within a minute of the iPhone and went shooting.
My moonset subject for the day was Fred Hartman bridge near Baytown, TX. What had occured to me during the drive was that I could probably find out how tall the bridge is and how far away from it I'd be standing. With a little trig that'd get me some real-world angles to compare with the angles and bearings predicted by TPE. It worked! Results below.
First, here's a map of where I was in relation to the bridge:
View Fred Hartman moonset shoot in a larger map
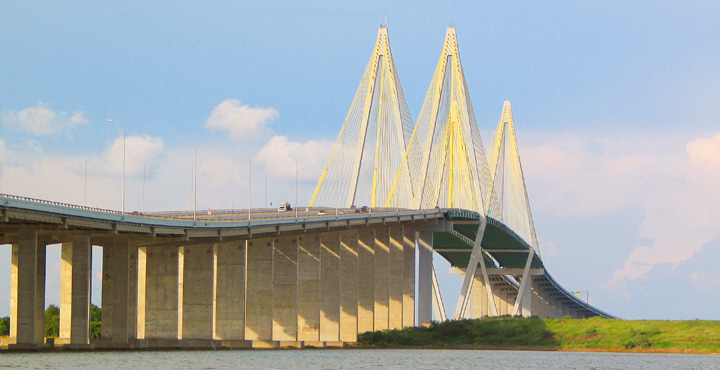
You'll need to zoom in on either end of the blue line to make sense of the whole thing. I was standing on the right (east) end of the line while shooting the bridge on the left (west) end. To give an easy point of reference the line ends on one of the large triangular pylons you can see in the photo above.
Now here's an overview of what TPE was showing me. I was standing where you see the red pushpin. The orange line leading up and to the left is where the sun would set later that day, while the blue line leading off to the lower left shows where the moonset I was there to shoot would be happening.

As you can tell by the M-Cell I was at home when I took these screen shots. That's a nice thing about TPE - it's easy to look at where things will be at any point in time. I was way too busy shooting that morning to take any screen shots.
So next we have a photo from the morning and the TPE screenshot that corresponds to that time of day, give or take 1 minute. In the photograph we can see that the moon is slightly below the top of the pylons, while the screenshot shows us that TPE thinks that the moon should be at 4.1° above the horizon.


Does that match what we see? Those pylons are 440' tall and I was standing 5,254' away from them, according to the map linked earlier. Given those numbers, the pylons should appear to top out 4.8° above the horizon. So that says the moon should be about 0.7° below the pylons. It looks plausible to me. And, btw, I now know what 5° above the horizon looks like.
Oh yeah - the two blue lines. The thicker one is where the moon will eventually set. The thin one shows the current bearing to the moon. It matches fairly well with the photo.
The next photo was shot at 6:25 AM. The thin blue line in TPE is now passing through the pylon on the left and the moon is predicted to be at 2°. Since the roadbed is about half way up the pylons it should be at about 2.4°. Also the thin blue line is bisecting the pylon and the moon is framed by the pylon. Not bad.


And finally the last usable photo I got that morning. I'd moved a bit, as far north as I could on the little spit of land. So the apparent moonset lines are now just to the north of the pylons and indeed that matches what we see. The moon has almost reached the horizon line, while TPE says it should be 0.6° above. Again, pretty decent agreement.


So my takeaways are that I've got a better feel for how high the moon (or sun) will appear when TPE give me an angle. Also, when planning shoots, finding the height of a nearby man-made feature and spending some quality time with Google maps can be very useful in helping decide when the moon will be in the relationship you want to the subject your're shooting.
BTW - the inspiration for writing this article came from the Martin Bailey Photography podcast. Martin has been giving away great free inspiration for a long time now and it's his example that prompted me to write this. Check him out - it'll be worth your while.
Mike
Hi Mike, these are some great shots. I've been using the Photographers Ephemeris for a couple of years now. I used it on the 13th and went to that location also, but I got there about 6:15, a little late to get the shots you got, I went to the back side of the building and shot it as the moon was going below the bridge.
ReplyDeleteAgain, great job on these.
I also use it to plan my photo outings to the San Jacinto Monument.
Hi Steve!
ReplyDeleteI wondered if I'd see any other photographers there. How'd we miss one another? If you walked by a black Jeep when you went to the back of the building that was mine. Had they started grilling before you left? Looked great!
Where can I find your shots?
Mike